


The cultivation of mushrooms is a fascinating activity that can also be undertaken at home, allowing you to obtain a fresh and genuine product. One of the fundamental aspects of this practice is the preparation of the substrate, the material that provides the necessary nutrients for mushroom growth. In this comprehensive guide, we will explore all the materials, equipment, and steps necessary to prepare an ideal substrate.
Necessary materials and equipment
Materials
- Straw or wood chips (preferably hardwood, not chemically treated)
- Sawdust (from hardwood for better yield)
- Agricultural gypsum (calcium sulfate, to regulate pH)
- Water (clean and uncontaminated)
- Mushroom mycelium
- Wheat straw or other cereals (optional, to improve substrate structure)
Equipment
- Large containers (suitable for pasteurization and mixing)
- Thermometer (to monitor water temperature during pasteurization)
- Sterile gloves (to handle the substrate and mycelium without contamination)
- Mask (to avoid substrate contamination)
- Blender, meat grinder or sturdy scissors (to chop the straw)
- Bucket or colander (to drain the pasteurized material)
- Transparent plastic bags or sterile containers with lids (for incubation)
- Spray bottle to maintain humidity during cultivation
Step-by-step procedure
1. Straw preparation
The straw must be adequately prepared to ensure a homogeneous substrate easily colonizable by the mycelium:
- Cut the straw into 2-5 cm pieces using a blender, meat grinder, or sturdy scissors.
- Remove any impurities or foreign bodies that could contaminate the substrate.
2. Pasteurization
Pasteurization is essential to eliminate any pathogens and competitors present in the materials:
- Fill a container with water and heat it to reach a constant temperature of 70-75°C.
- Immerse the straw or wood chips completely in the hot water.
- Ensure the material is fully submerged, using a weight if necessary.
- Leave the material submerged for at least 1-2 hours.
- Thoroughly drain the straw and let it cool to room temperature.
3. Substrate mixing
Once cooled, the materials are carefully mixed to create the ideal substrate:
- In a large sterile container, combine the pasteurized straw with sawdust and other optional ingredients (e.g., cereal straw).
- Add agricultural gypsum to balance the pH and improve substrate structure.
- Ensure the substrate is moist but not excessively wet; when squeezed in your hands, it should release only a few drops of water.
4. Inoculation with mycelium
The inoculation phase is delicate and requires strict hygienic conditions:
- Wear sterile gloves and a mask to reduce the risk of contamination.
- Evenly spread the mycelium on the prepared substrate.
- Mix everything carefully, ensuring the mycelium is evenly distributed.
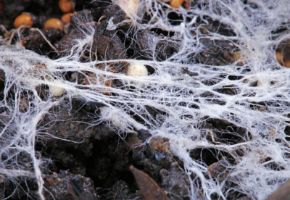
5. Incubation
After inoculation, the substrate must be incubated under controlled conditions to allow the mycelium to colonize the material:
- Transfer the inoculated substrate into transparent plastic bags or sterile containers with lids.
- Seal the containers, leaving small holes for ventilation if necessary.
- Place the containers in a dark and warm place with a constant temperature of about 20-24°C.
- Regularly check to verify the progress of mycelium colonization, which should complete in 2-4 weeks.
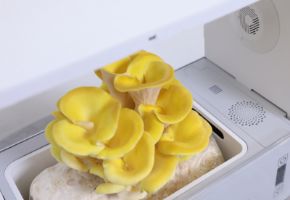
Maintenance and harvesting
After incubation, transfer the containers to an environment with indirect light and maintain high humidity using a sprayer. After a few days, the mushrooms will start to sprout and will be ready for harvest once mature.
Too complex? NaturNext has the solution for you!
Preparing a quality substrate for mushroom cultivation requires effort, but by carefully following these steps, excellent results can be achieved. With a bit of practice, you can enjoy the satisfaction of growing your fresh mushrooms at home.
Do you think these steps are too complex for you? NaturNext has an easier way: ready-to-use substrates.
Happy cultivating!
The fungal kingdom is a universe in continuous evolution, with new scientific discoveries emerging every year about their extraordinary benefits for gut health and overall well-being. From now on, when you see a mushroom, you will no longer think only of its taste or appearance, but of all the therapeutic potential it holds in its fibers and bioactive compounds. ✉️ Stay connected - Subscribe to our newsletter to receive the latest studies on: Nature offers us extraordinary tools to take care of our health. Fungi, with their unique balance between nutrition and medicine, represent a fascinating frontier we are only beginning to explore. Continue to follow us to discover how these extraordinary organisms can transform your approach to well-being.Continue your journey into the world of fungi